
OpenWGA 7.9 - OpenWGA Concepts and Features
Design and development » Extending OpenWGAWriting Java in an OpenWGA project
OpenWGA developer studio is based on Eclipse, which itself is an application framework but also a sophisticated development environment for creating Java code. So every installation of the studio also features the possibility to develop Java code. Normally this is done in dedicated "Java projects".
OpenWGA Runtime and Plugin projects in developer studio normally do not allow to develop Java code inside them. It nevertheless is possible to develop Java code in an OpenWGA project and also let the resulting classes be instantly deployed to an OpenWGA design, be it a regular design directory or a plugin design. This process, necessary to develop any Java extension for OpenWGA is described here.
1. Give an OpenWGA project Java capabilities
First the project needs to be given the capability to host and compile Java code. This unfortunately currently can only be done manually as there is no function inside the studio for that. Follow this process for any non-java project that is to host Java code:
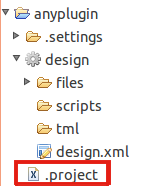
- Open the view "Navigator". You can do this via menu "Window > Show view > Navigator". The navigator should show up in the studio on the left side. Identify it by the header showing the title "Navigator". It shows all your projects in a flat way. The special thing about the navigator is that it displays all the files inside your projects, even those that are hidden system files.

- Find your project to convert in the navigator view and expand its contents. Among other files you should find a file named ".project" in the root of your project. This is a file telling the studio what type of project the folder is. Double-click it to open it in a text editor:
- Now the contents of the file will look something like this:
<?xml version="1.0" encoding="UTF-8"?>
<projectDescription>
<name>anyplugin</name>
<comment></comment>
<projects>
</projects>
<buildSpec>
<buildCommand>
<name>de.innovationgate.eclipse.ids.builders.WGADesignResourceValidator</name>
<arguments>
</arguments>
</buildCommand>
</buildSpec>
<natures>
<nature>de.innovationgate.eclipse.ids.natures.WGADesign</nature>
</natures>
</projectDescription>
This is a simple XML format file where we will need to add two things:
First a new tag <buildCommand> inside the <buildSpec> tag:
<buildCommand>
   <name>org.eclipse.jdt.core.javabuilder</name>
   <arguments>
   </arguments>
</buildCommand>
Then a new tag <nature> inside the <natures> tag:
<nature>org.eclipse.jdt.core.javanature</nature>The result should look like this:
<?xml version="1.0" encoding="UTF-8"?>
<projectDescription>
<name>anyplugin</name>
<comment></comment>
<projects>
</projects>
<buildSpec>
<buildCommand>
<name>de.innovationgate.eclipse.ids.builders.WGADesignResourceValidator</name>
<arguments>
</arguments>
</buildCommand>
<buildCommand>
<name>org.eclipse.jdt.core.javabuilder</name>
<arguments>
</arguments>
</buildCommand>
</buildSpec>
<natures>
<nature>de.innovationgate.eclipse.ids.natures.WGADesign</nature>
<nature>org.eclipse.jdt.core.javanature</nature>
</natures>
</projectDescription>
Now hit the save button
in the toolbar to save your changes.
- Next we should close and open the project again to give the studio the possibility to correctly set it up, as it might not really cope with those changes "on the fly". On the project folder in Navigator or Package Explorer do a right-click and choose "Close project" from the context menu. After the closing operation is finished open the same menu and click "Open project".
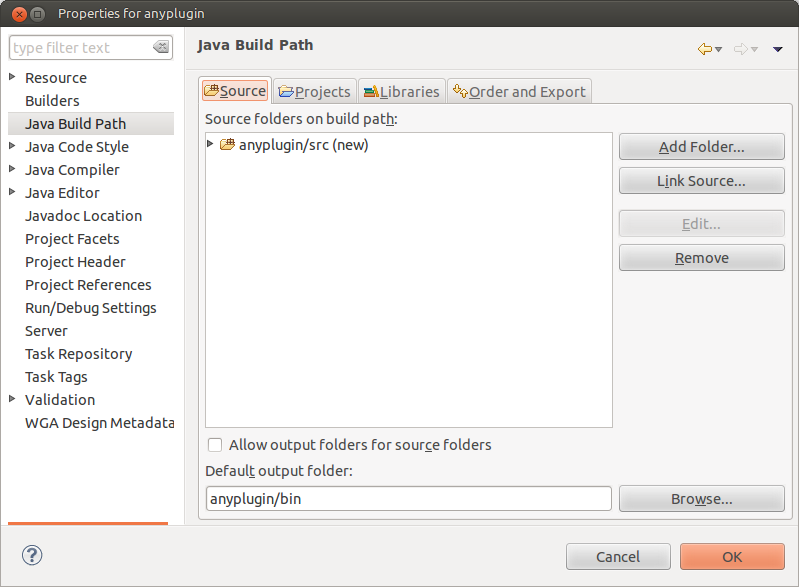
- Now we need to setup Java support for the project. Again do a right-click on the project folder, this time choose menu item "Properties". This opens a quite complex dialog containing all the settings for your project. Choose the setting Java Build Path from the list on the left. Then switch to the tab named Source. The dialog now should look like this:
Here we see that the studio already assumes a new folder "src" to contain the Java source files for this project. It will get created automatically once we hit the "OK" button.
At the bottom of this dialog we see the field labeled Default output folder. We are going to change this, so the compiled Java classes will automatically be part of an OpenWGA design for the OpenWGA server to pickup. Click the "Browse..." button next to it.
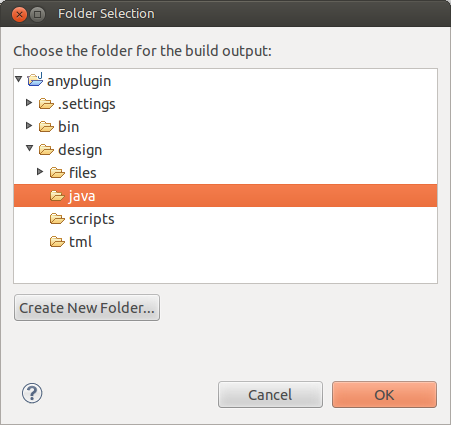
In the dialog which appears now navigate to your design directory. It should by now only contain the subfolders "files", "scripts" and "tml". Use the button Create New Folder... to add a new folder on this level. It must be of name "java":
Choose this folder, then click "OK" here. Compiled Java classes will automatically be put here and the OpenWGA server will recognize this folder as part of its classpath.
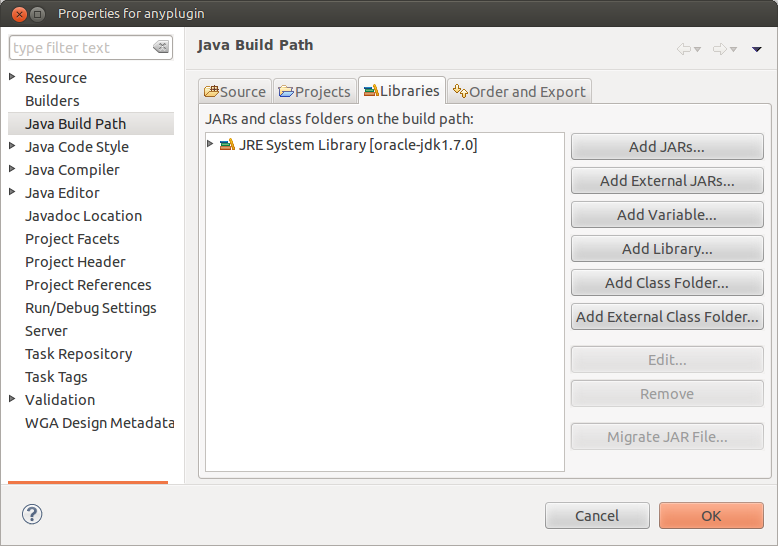
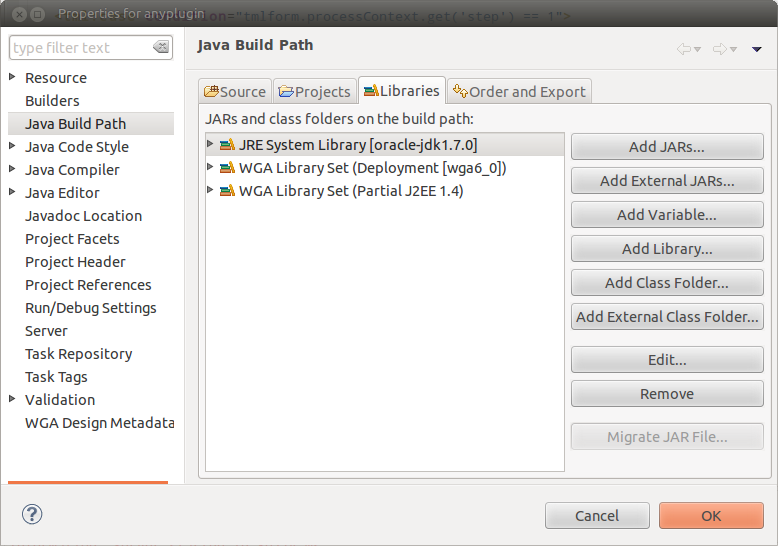
- We have one more thing to do in the project properties dialog. Switch to the tab "Libraries". It contains those Java libraries whose classes are available to your future self-written classes as Java classpath. Your Java classes are to be run inside the OpenWGA server, so we need to add the libraries that OpenWGA provides to this classpath:
- Click button "Add Library...."
- In the following dialog choose "WGA Developer Studio Libraries" and click "Next"
- What follows is a list of OpenWGA deployments installed into your studio. Check one deployment whose OpenWGA version matches the minimum version that your Java functionalities should be compatble with. Changes are there is only one if you never have added another deployment to your studio. You will see that also a "Partial J2EE 1.x" entry is checked automatically once you have chosen a deployment. Now click "Finish"
The "Libraries" tab on the properties dialog should now look something like this:
We now are finished. Click "OK" on this dialog and confirm all questions that follow this.
Your OpenWGA project now should look like this in view "Package Explorer":
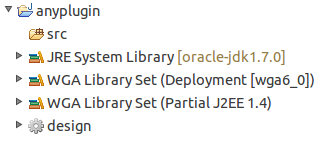
You see a "src" folder to contain your Java classes, plus entries for every Java library available to your project. What you won't see (in Package Explorer, but in Navigator) is the extra folder "java" in your design. This is hidden here because the studio generates its contents automatically.
2. Using Java in an OpenWGA Project
You now are free to create Java classes inside your OpenWGA project just by Eclipses (on which the studio is based) normal Java development capabilities. The studio will automatically compile Java source code into class files which are added to the OpenWGA design that you chose in the step before. The integrated OpenWGA server will automatically pick up those classes, so they are instantly available to the server runtime.
Regarding this "java" folder the same rules apply as for other Java Libraries. OpenWGA sees the "java" folder just as another library which happens to be a folder rather than a file. If you modify Java code while the OpenWGA server is running then the Java runtime of the server has a chance to pick those changes up "on the fly" after you save the code and it gets automatically recompiled. If that works is dependent on the changes you do to the Java code. Java is able to load some changes into a running process but not all. If you write some changes while the server runs that have a deeper impact on the running code, changing the signature of a method for example.then you will get notified by the studio via dialog that Java is not able to pickup the change. You then have the option to ignore this and keep the server running or to stop it. Starting the server again after that will have your changes loaded.
If you are developing an OpenWGA plugin which you distribute as plugin file then the distribution will not have the "java" folder contained directly. Instead the distribution process will create a JAR library in the system file container which contains the classes from the "java" folder. That way your custom Java classes are also contained and active when your design gets installed via plugin file.
3. Accessing custom Java libraries from your Java code
You may have added Java libraries to your design which you now want to access in your Java code. While OpenWGA automatically picks up any JAR file inside the system file container automatically the WDS does not. You have to manually add any JAR to your projects class path in order to access its classes in your own Java code.
This however is easy. Find your added JAR library file inside the "files/system" folder of your design and right-click it. From the menu choose "Build path > Add to build path":
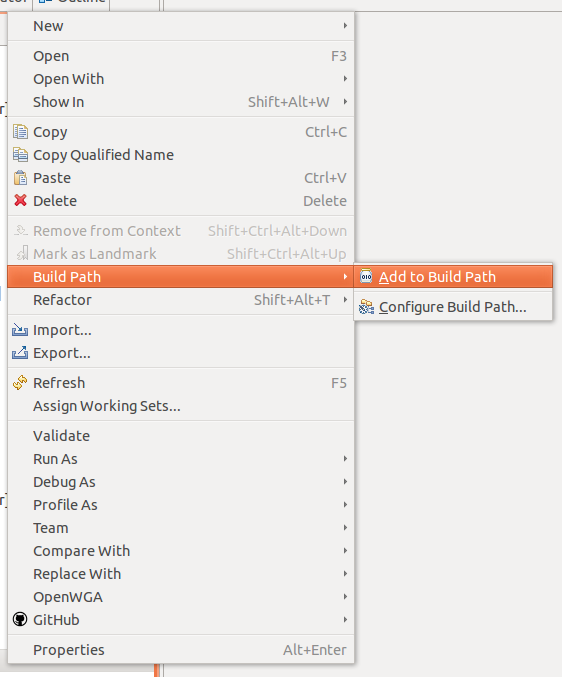
After executing that action your JAR library will be added to the build path of your java project and you will be able to use its classes in your Java code.